Oil Leak Adventures, I am not sure how many parts of this story there will be! As I have mentioned before my GT is a V8 conversion and I didn’t do the conversion. So,when there are maintenance or issues needing work, this is the beginning of an adventure. There are 3 steps of (a) finding the issue, (b) determine the parts that will be needed and (c) source and purchase the parts. This is not like a regular stock MGB where the Moss catalogue has the answers to parts needed!
Background
I had been noticing an oil leak that has been getting worse over time. It started an in depth investigation to identify the root cause. During one of the oddly warmer than usual February weekends I did that. The leak seemed to be coming from the 90-degree adapter. This enables a run of hose to the remote oil filter adapter. There is very little room for an oil filter installation as intended with the Oldsmobile GM215 V8 block. So you need a solution to work around this.
Once under the car there was indeed a constant drip coming from the adapter. However, watching a while there were other drips coming from the bottom of the oil pump cover/filter adapter. So basically, worse than I expected it to be! A little more investigation took place. I tried to make sure that oil wasn’t coming down the block or from the valve covers or elsewhere. Putting some shop towel higher up the block remained dry so that seemed to confirm the pump cover/filter adapter as the culprit.
Getting Access
Having dealt with the harmonic balancer issue previously I was already familiar with radiator removal. So, I started on that to get access and room to work on the problem area. Like most things this was easier the 2nd time around and gave me the room to work. I was able to then access the hose fittings at the 90-degree adapter for the oil filter. To my, pleasant, surprise I was able to get these to undo and removed relatively easily.

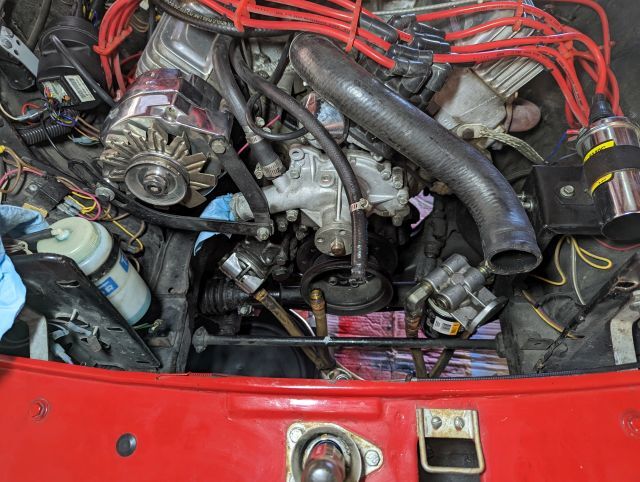
Oil Filter Adapter & Hoses
I was then able to undo the 90-degree adapter which revealed how that worked and what it was. Looking closely I was able to find a 1413C part number on it. This was not quite what I expected (internet searches were suggesting a 1420). This seems to be a Trans-Dapt part. I had contemplated moving to a swivel adapter that would allow the oil filter to hang off an adapter and remove the hoses etc. but parts were not available. So, in the end, I have just ordered a new O-ring for the existing part and will be just keeping the existing setup, despite all the incremental leak points this has.
The hoses from the remote oil filter have a manufacturer date in 2001. This was the beginning of a long list of “might as well” items. I found this hose was “Jiffy 7212” and uses push on connectors. I discussed with John Mangles and a lot of internet searching revealed a local supplier that had the hose and new fittings. So, I decided to get new fittings as well as hose and eventually ended up using slightly different hose that performs the same. If you need hydraulic hoses of pretty much any description the folks as Hyspeco 10435 Baur Blvd, St. Louis, MO 63132 can likely have a solution for you. The new hose works with my color scheme!

Oil Pump Cover
Removing the oil pump cover/filter adapter was a little more complex than I thought. It has 4 bolts I could see. In addition there are 2 bolts inside the filter connection area. Once I discovered and removed these as well the cover came off easily and out dropped a big gear/cog. Fortunately, John assured me this was not a problem/unusual and I now had the part in hand. There are several options for this part as there are many versions and variations of this engine.
It turns out mine uses a “Metric” cover/adapter. I was able to search and find various options for the necessary gasket, which seems to be common amongst the various configurations and added 2 of these to my parts ordering list. When it comes to gaskets and O-rings, I always order 2 to ensure any mishaps on the first try don’t mean making a new parts order! I also read up on the need to pack the oil pump when this gets reinstalled with petroleum jelly. It’s documented in the F85 1961 Oldsmobile equivalent of a Haynes manual I have that came with the car. This will wait to be more fun for another day. If not done then apparently getting the oil pump primed and functional will be an issue.

Cooling System “Might as Well”
The second element of might-as-wells started with the cooling system. It’s a fair amount of work to remove the radiator. Also the water pump pulley has a bit of a wobble that seems to be caused by the mounting not being square to the pump shaft. Using part numbers cast onto the water pump “374R1” I was able to identify a replacement. This is pump for various Jeep cars as well as Olds/Buick.
I also wanted to replace the upper and lower main hoses which has proved more complex. The lower hose did have a barcode and part number label on it which helped, although my first cross reference to a part seems to have been wrong. I got another hose locally from Autozone. With large amounts cut off it can duplicate the current part which has also been cut to fit.
The upper hose only seems to have a faint part number on the hose itself. Although I thought I had found a similar part, when delivered I’m not convinced it will work. Time will tell on that one. I did go ahead and get the water pump installed, albeit with a bit more drama than I would have liked. I won’t bore you with the additional details other than I broke a bolt.

This car is a conversion and used up in Michigan. In full Missouri summers, when stuck at lights or slow traffic, the car seems to run warm enough to make the engine rough and sometimes die at idle. So, I also wanted to check out the thermostat and consider a replacement if nothing else than now was a good time. Also, I usually get a whiff of antifreeze when the car starts so there’s some leaks somewhere. The removal of thermostat housing was not too much of an issue. A 170-degree thermostat was used. This seems to split the difference between the OE 180-degree options and the “alternative” 160-degree unit.
There seems to be a significant amount of online debate between the 180 and 160 “camps” for what is right for a GM215 in an MGB and in temps below 50F the car never seems to get up to “normal” temps. However, as John Mangles reminded me, probably better to worry about temps when the weather is hot and so I have obtained a fail safe 160F thermostat to go in. The engine does have much less space in an MGB engine bay, and my setup has block hugger headers so there’s a ton of heat under the bonnet!
I took some time to clean up the thermostat housing and noticed that one of the studs used to hold it doesn’t seem to fully screw into the block. There was previously way too much “goop” in and around the thermostat when I took things apart so I’m trying to get things clean and tight fitting. I’m still fighting this stud issue. To resolve this I may have to cut the last 2-3 threads off to get the snug fit I want and try and prevent leaks.


Radiator Debate – End of Part 1
Lastly there has been some thought to the radiator and whether an aluminum solution would help. There’s no doubt it would as the aluminum units are known to cool better. I have not been able to identify the original source of the radiator and it has also been customized, most likely to deal with bonnet clearance issues. It sits further forward than my 77B radiator does and the area where an oil cooler might have been on a stock car has been removed. For a while I thought this may have been a stock MGB GT V8 radiator but there are variations in dimensions, the stock unit seems to be shorter. So, in the end I have had the existing radiator tested, repaired, and boiled out so we will see how that does with the lower temperature thermostat. This was done via American Industrial Radiator at 3653 South Broadway, St. Louis, MO 63118. This is a before repair picture, it came back looking much nicer.
This is where I have got to so far. The next phase will be to deal with the oil pump cover and associated parts.